Sweet ‘n Sassy Hop and Giveaway

Hello fellow Alchemists,

Today I am a part of the Sweet ‘n Sassy Hop with a group of very talented ladies! Please don’t forget to check them out after you watch my video, they are all linked below! I had the opportunity to use some Sweet ‘n Sassy Digi stamps for this hop. They are so adorable I even bought a couple of extra ones and there are loads more I want to buy. There is even a Sweet ‘n Sassy Hop giveaway

Firstly I made some tags for some yummy Caramel Tarts that I made using the Daffodil Block coloured with Copics. I also used my Heidi Swapp Minc to foil one of the sentiments from the Kitchen Sentiments set. I used some math to make the daffodils into tags, one was a little wonky but I fixed it.

Daffodil Block Tags

Next I made a card with the sweetest digi, Peek-a-Boo Sophie. She’s just so adorable! I coloured her with copics too and also used the Minc to foil a sentiment from the Sentiments For Him digi set. Some of the sentiments in that set are unisex so they worked very well here.

Peek-a-boo Sophie Card

Valentinne’s Projects

Turtles Heart Balloons Card

Then I made another card using the Turtles Heart Ballons digi coloured again with Copics. I used some Kaisercraft With Love paper as the background and my Kodamaru corner rounder on selected layers of my image and sentiment which was from Valentine Sentiments.

Top View of Treat Box

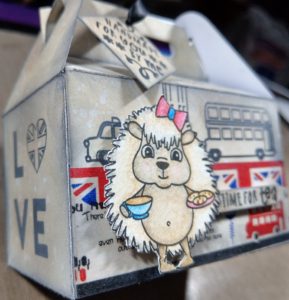
Finally I made a treat box to match the previous card using the same With Love paper. Valentine Bunny with Sentiment Digi was used here and I used Copics to colour it before fussy cutting it out. I used the Some Bunny sentiment that came with the rabbit and the For the man I love from the Valentine Sentiments and foiled them red with the Minc. For a little extra pizzazz I ran some sparkly red tape around the base of the box.

Valentine’s Bunny Projects

I really hope you enjoyed the Sweet ‘n Sassy Hop. Watch the video to find out how to enter the giveaway and to hop along with the other ladies. I will also add their links below.

All My Projects

Thanks for hopping by, be sure to hop along, bye for now.

The Arty Crafty Alchemist

Sweet ‘n Sassy Hop participants

Crafting While Caffeinated: https://youtu.be/Nccx12aPD9U
Multiplicity Crafts: https://youtu.be/Vcwqt49Sp0Y
Notable Ink: https://youtu.be/HWDZLE6fJho
The Joyful Soul Creates: https://youtu.be/mKi6vksA-PQ
My Creative Life: https://youtu.be/oMgo8olOBhw
RiCre8s: https://youtu.be/5vRfjm7PZp4
Crafty Pink Pixie: https://youtu.be/Hb0L6EV-Esg
A Card Day’s Work: https://youtu.be/Zkaw4IghBbI
Joanne Herbert: https://youtu.be/Gqns3HhtyFI
Creative Pixie Design: https://youtu.be/aCr8C1085XU
Jeanie Ellis: https://youtu.be/JA7OkenBoJo
You are here ->->-> Arty Crafty Alchemy: https://youtu.be/5n6C9ODUpIs
Faith Dream Create: https://youtu.be/r6bQfM6Tshs
Teris Mailbox: https://youtu.be/Mdr6VKyj0Uk
Debbie J’s Crafting Corner: https://youtu.be/rpL5AzJnvY8
Adrianne Galvin: https://youtu.be/opJT1tdhZp8
Craftivation: https://youtu.be/HTNDiLlIZ4w
Gather and Create: https://youtu.be/36GG4t4s7cA

Card and Matching Canvas feat August 2018 LaLa Land Hedgehog Hollow Box

Hello fellow Alchemists,

For this months LaLa Land Hedgehog Hollow Box I went all out! This week making a total of three projects and matching them to last weeks box project. You can get your own Hedgehog Hollow box here.

Using the Marvy Uchida watercolour pencils that were sent to regular subscribers, I coloured three hedgehogs. I used mostly the brown and black pencils, using the black to darken the brown tone . To carry through the British theme through to the hedgehogs I added some red and the darker blue to the hedgehogs accessories.

I worked on my card and canvas at the same time, I applied Distress Oxide inks the same way I had for the box. I used Antique Linen, Walnut Stain and Black Soot. Wide washi tape was added to the bottom of both pieces to I could tie them in with the box too.

Next I used the LDRS Raven hybrid ink to stamp the images and sentiments.  The stamps I used were Hedgehog Hollows Global Love and Sending Hedgehugs and Looking Sharp from LaLa Land Crafts. Again I used the same images of Big Ben, the bus and taxi to tie back to the box.

For the card and canvas I used foam tape behind the hedgehogs and sentiments. I turned the sentiments into banners by cutting a fish tail at one end. Under the hedgehogs little feet  I used Kool Tak clear foam tape.

The envelope was the easiest piece to make as all I did was add the washi at the bottom and the third hedgehog with glue. I really hope you enjoyed this months projects using the LaLa Land Hedgehog Hollow Box. Go create some arty crafty alchemy yourselves and I’ll see you all later!

The Arty Crafty Alchemist


August 2018 LaLa Land Crafts Hedgehog Hollow Box and Project

  • Hello fellow Alchemists,

Today I am sharing with you the August 2018 LaLa Land Crafts Hedgehog Hollow Box and a Project. It’s not  a card this time, I’m branching out with a decorated box. 😃 You can see one of my previous Hedgehog Hollow projects here.

Sometimes I start a project with a clear idea of that I want to make. Today I definitely had some inkling that fully formed as I went along. I knew I wanted to use the washi and the Lve stamps with the hearts. The rest was just going with the flow and seeing what happened…

The box die is the Brutus Monroe Gable box die and I added colour to it with makeup brushes and Distress Oxides. I used Antique Linen and Walnut Stain with some Black Soot around the edges. The stamping was done with LDRS hybrid ink in Raven.

All three stamp sets in the box got a workout. I used the Global Love set for the boxes short sides then added washi the long sides. The Hedgehog and Time for Tea were from the LaLa Land Looking Sharp stamp set and also the bus, Big Ben and the cab too. Lastly I used the Sending Hedgehugs set to stamp the sentiment on the tag hanging from the box.

The hedgehog I coloured with the Marvy Uchida watercolour pencils regular subscribers got. There seems to be quite a lot of pigment in these pencils and I want to play with them some more. Blending pencils together gave me an endless amount of colours though I didn’t need many.

I hope you enjoyed this week’s project and if you watched the video you would have heard what sparked the idea for this project. I hope you are creating some arty crafty alchemy yourself and I will see you next time. Bye for now.

The Arty Crafty Alchemist