Scrapbookingncraft May 2021 Project Chipboard Windows

This month for my Scrapbookingncraft May 2021 Project Melinda sent some chipboard windows to play around with. Watch the video for a 15% off discount code. I made some cards again. The plan was to make a second project but my daughter needed some help during her pregnancy so I didn’t get there.

I did manage to get a prototype made and a second card filmed though. The first was created using Worn Lipstick for the background papers. For the Damask chair from Stampendous I covered it in Frosted Crystal embossing powder from ranger. It didn’t turn out how I hoped. Not enough definition! The cat and dog I had precoloured from lawn fawn. The background brick paper is from The Craft Stall\Rosie’s Studio Flourish paper pad.

Worn Lipstick Prototype Card

On the second card I used Tumbled Glass Oxide but I felt I should have used a darker ink like Broken China instead so that there was more contrast. The background stamp used on both cards is Floral Wall Paper from Kaisercraft. Both use flowers and vines from Art Impressions Birdhouse Cubbies set and the paper is from Prima Fairy Rhymes.

Tumbled Glass Card

I coloured the cat and dog with Copics and the sentiment is from Hero Arts Operation Write Home. If you’d like to see my previous Scrapbookingncraft project go here and to get the windows here. I hope you enjoyed my Scrapbookingncraft May 2021 Project this month. Let me know below whether you prefer the pink or blue. Hope you are creating some arty crafty alchemy yourself! See you next time.
The Arty Crafty Alchemist

Scrapbookingncraft March\April 2020 DT Project

Hello Fellow Alchemists

G’day G’day, it’s been a while lol. Lots has been going on behind the scenes! This week I am bringing you projects featuring a stencil from Melinda at Scrapbookingncraft. I even share a discount code in the video! Here is a link to a previous Halloween Collab I did with Melinda.

Watch for the code

Melinda sent me the lovely stencil Shattered Circle to use this month so I based my project around that. My first couple of attempts didn’t quite turn out the way I hoped so I kept practicing!

Thinking of you

with this first card I used Picked Raspberries and salty Ocean Distress inks with Nuvo Sparkle paste over the top. I used the MFT Radiating Dots stamp in the background with Spun Sugar ink.

shiny dimension

The sentiment is chipboard also from Scrapbookingncraft covered in spun sugar oxide and wink of Stella then clear embossed three times.

There be dragons
Squeezed Lemonade and Barn door

To switch it up for the video I swapped to Squeezed Lemonade and Barn Door Distress Ink. These two didn’t quite work the way I’d hoped but they still look nice together. This time I used BoBunny glitter paste.

Dragon card

Both the Dragon and the Hello Friend are again chipboard from Melinda. I wished up this time and used Squeezed Lemonade and Barn Door Distress paints to colour them. To these I added three layers of clear sparkle embossing powder for that nice shiny dimensional look. The sentiment strip accross the Dragon is a Spellbinders Glimmer plate from Sentiments II.

Hello Friend

I hope you enjoyed this look at the new stencil from Scrapbookingncraft. If you did head over to Melinda’s website with the discount code from the video and check out some of the cool items in the shop. Hope you are creating your own arty crafty alchemy. Bye for now.

The Arty Crafty Alchemist

Valentine’s and Love Cards

Hello Fellow Alchemists,

Today I am sharing with you the Hedgehog Hollow December 2020 Box that has a strong Valentine’s/love theme. I ended up making two cards in the video and showed a bunch more I made at the end. You can see a previous box here and get your own box here.

For the first card I used Catherine Wheel and Storm Cloud Nuvo Shimmer Powders to make a background and then stamped the background stamp with the Clear Mark embossing pad. I then used Stampendous’ detail gold embossing powder to emboss the background and the sentiment strip with the little birdy and Love You.

Valentine’s and Love Cards

Bonus Cards

The next 3 cards are only shown in the video, I used the stencil from the box with some Distress Oxide and a blender brush. I layered a watercoloured floral heart over one, and added Altenew Build Rose flowers to the other two with sentiment strips. For the other card not made in the video I used the background I did make and layered 3 sets of the LOVE die I got from the range in England.

I made a mess…

This next card was messy! I started by stamping the heart ornaments across the top and colouring them with Nuvo Coral Alcohol Markers. I then embossed My Love with black Nuvo embossing powder and the hearts with Stampendous detail gold. Here’s where things went bad… I used the Nuvo Midas Touch pen to add gold shimmer and it went everywhere! To cover the mess I used some DoCrafts Clear Dimensional Glaze to the hearts and cut an extra one to add over the mess in the corner.

I hope you enjoyed these cards using the Hedgehog Hollow December 2020 box. In the end I had fun making some of them even if I did get frustrated at my constant mistakes! Let me know your fave Below. Thanks for stopping by.

The Arty Crafty Alchemist

Papercraft Essentials Issue 181

Today I am sharing with you Papercraft Essentials Issue 181 and making a few projects mostly with the 3D embossing folder. This is the first 3D embossing folder in my stash!

I really like this 3D embossing folders versatility from Papercraft Essentials Issue 181 because the embossed side looks like gems and the debossed side looks like honeycomb. The honeycomb side made a great backdrop to the Elizabeth Crafts Buzzin’ Around stamps and dies. With a little Wild Honey Distress Oxide and some sparkly silver vellum the cards was complete.

3D Embossing folder and Elizabeth Crafts

The next two cards I ran with the Geo theme and used Tim Holtz’ Geo Springtime Butterfly die cuts for one card, blending out some more oxides in the background. Then I used Salty Ocean and Wilted Violet as my colours of choice and Happy Mother’s Day was heat embossed in white finished this card off. The next card has a background of Candied Apple Oxide and some Poppy Crafts Hexagons. The Hedgehog Hollows Finding Your Way Heart is stamped and embossed with Glacier White Nuvo detail embossing powder. The sentiment is from Honey Bee Stamps

Geo Butterfly and Heart Cards

The last card showcases both the Geo stamps and 3D embossing folder from Papercraft Essentials Issue 181. The fox was stamped with memento, Coloured with Copics in YR21 YR24 and YR27, then fussy cut out. The vellum looked so pretty as the bee wings that I decided to use a pale blue piece as the backdrop over the 3D embossing folder. I stacked a hello die cut and stamped foxy lady on a banner to finish off the card.

Foxy Lady card

I hope you enjoyed this look at Papercraft Essentials Issue 181. But my one criticism is that my embossing folder has almost split at the crease as a result of running it through the Cuttlebug a couple of times. Some box tape should sort that out because I really want to use it more! Let me know below which is you favourite card bellow. Thanks for stopping by.

The Arty Crafty Alchemist

Card and Matching Canvas feat August 2018 LaLa Land Hedgehog Hollow Box

Hello fellow Alchemists,

For this months LaLa Land Hedgehog Hollow Box I went all out! This week making a total of three projects and matching them to last weeks box project. You can get your own Hedgehog Hollow box here.

Using the Marvy Uchida watercolour pencils that were sent to regular subscribers, I coloured three hedgehogs. I used mostly the brown and black pencils, using the black to darken the brown tone . To carry through the British theme through to the hedgehogs I added some red and the darker blue to the hedgehogs accessories.

I worked on my card and canvas at the same time, I applied Distress Oxide inks the same way I had for the box. I used Antique Linen, Walnut Stain and Black Soot. Wide washi tape was added to the bottom of both pieces to I could tie them in with the box too.

Next I used the LDRS Raven hybrid ink to stamp the images and sentiments.  The stamps I used were Hedgehog Hollows Global Love and Sending Hedgehugs and Looking Sharp from LaLa Land Crafts. Again I used the same images of Big Ben, the bus and taxi to tie back to the box.

For the card and canvas I used foam tape behind the hedgehogs and sentiments. I turned the sentiments into banners by cutting a fish tail at one end. Under the hedgehogs little feet  I used Kool Tak clear foam tape.

The envelope was the easiest piece to make as all I did was add the washi at the bottom and the third hedgehog with glue. I really hope you enjoyed this months projects using the LaLa Land Hedgehog Hollow Box. Go create some arty crafty alchemy yourselves and I’ll see you all later!

The Arty Crafty Alchemist


August 2018 LaLa Land Crafts Hedgehog Hollow Box and Project

  • Hello fellow Alchemists,

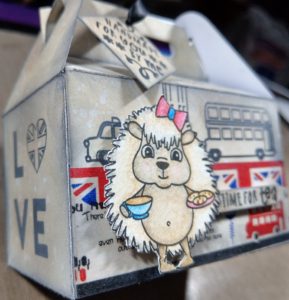
Today I am sharing with you the August 2018 LaLa Land Crafts Hedgehog Hollow Box and a Project. It’s not  a card this time, I’m branching out with a decorated box. 😃 You can see one of my previous Hedgehog Hollow projects here.

Sometimes I start a project with a clear idea of that I want to make. Today I definitely had some inkling that fully formed as I went along. I knew I wanted to use the washi and the Lve stamps with the hearts. The rest was just going with the flow and seeing what happened…

The box die is the Brutus Monroe Gable box die and I added colour to it with makeup brushes and Distress Oxides. I used Antique Linen and Walnut Stain with some Black Soot around the edges. The stamping was done with LDRS hybrid ink in Raven.

All three stamp sets in the box got a workout. I used the Global Love set for the boxes short sides then added washi the long sides. The Hedgehog and Time for Tea were from the LaLa Land Looking Sharp stamp set and also the bus, Big Ben and the cab too. Lastly I used the Sending Hedgehugs set to stamp the sentiment on the tag hanging from the box.

The hedgehog I coloured with the Marvy Uchida watercolour pencils regular subscribers got. There seems to be quite a lot of pigment in these pencils and I want to play with them some more. Blending pencils together gave me an endless amount of colours though I didn’t need many.

I hope you enjoyed this week’s project and if you watched the video you would have heard what sparked the idea for this project. I hope you are creating some arty crafty alchemy yourself and I will see you next time. Bye for now.

The Arty Crafty Alchemist

My First 10 Distress Oxide Swatches

Hello Fellow Alchemists,

Today my lovely assistant, better known as my daughter, and I are creating Distress Oxide swatches from my first 10 colours. You saw me haul the Distress Oxides here. We are using four different methods to create the swatches and adding water to some.

We are creating our Distress Oxide swatches using manila tags, brushes, blending tools and foams and the ink pads themselves. The Distress oxides have a different effect than regular distress inks. When water is added they “oxidise” or form a paler layer on top. But that’s not all, because Distress Oxides are both a pigment and a dye based ink pad the more water you add the more of the dye ink wicks out the bottom. Remember the Distress Embossing powder over regular Distress Ink and spritzed with water? It is similar to that except now we have the pigment ink on top doing it’s magic instead.

Firstly my assistant took a brush and blended the colour over tags lightly? Ok well she was a bit heavy handed but she didn’t know any better, lol. Then she used the Blending Tool to do the second Distress Oxide swatch. For the third and fourth swatches she went directly to the paper from the ink pad. The first two swatches had water flicked on them from her fingers, the third had water from the Distress Spray Bottle and the fourth had no water.

We created Distress Oxide Swatches in all 10 of the colours I currently own. Antique Linen, Squeezed Lemonade, Picked Raspberry, Candied Apple, Wilted Violet, Salty Ocean, Peacock Feathers, Cracked Pistachio, Walnut Stain and Black Soot. I picked these colours to try and have a somewhat well rounded palette. Also because these blend so well it’s easy to make your own colours as well while blending. Above is the re-swatch of the black soot as the right sample is the one with the dry inkpad.

What is your favourite Distress Oxide colour?

Hope everyone is creating their own Arty Crafty Alchemy this weekend. I hope to but my daughter has part one of a science experiment due 🙁

The Arty Crafty Alchemist

#distressoxide #timholtz #swatching #lawnfawn #stampshammy #rangerink

Scrapbook.com Haul Video March 2018

Hello fellow Alchemists,

Welcome to my brand spanking new arty crafty space :). Come join in for some arty crafty hauls like today’s video, upcoming product reviews and tutorials as well as some general arty crafty goodness. This channel has been started to get myself back into the swing of creating again as I have had over a year of not really doing much and I love to create!

Recently I did at scrapbook.com order. Living in Australia  means it takes a good while to get to me, my parcel took around two weeks to arrive! There was one thing I bought that I forgot to show you as it was mixed in with my sisters part of the order so scroll down after the video to see what it was.

Continue reading “Scrapbook.com Haul Video March 2018”