Scrapbookingncraft August 2021 Project Leaves

This month for the Scrapbookingncraft August 2021 Project we are using Flowers & Vines White Medium Leaves. I also decided to have a giveaway for my birthday! You need to watch the video… To see my last project for Melinda click here.

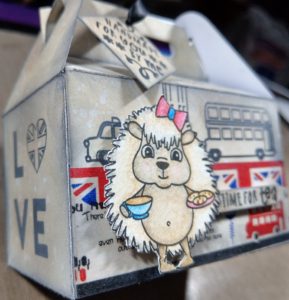
I used several different items from Melinda’s shop which I will link below. There were a couple of different mediums used, Inka Gold, Distress Ink, Distress Spray Stain and Dylusions. I used stamp sets from MFT and Altenew for a couple of the sentiments and the flowers.

Again you need to watch the video to see the giveaway. Melinda has generously provided a 15% off coupon to Scrapbookingncraft as well. I hope you enjoyed this months Scrapbookingncraft August 2021 Project video. Let me know your favourite card below. Hope you’re creating some arty craft alchemy yourself. Bye for now.

The Arty Crafty Alchemist

Scrapbookingncraft YouTube channel: https://www.youtube.com/channel/UCeEezMZK0C1l3bRdtp0Ivug

Scrapbookingncraft website:
https://www.scrapbookingncraft.com.au/

Flowers & Vines White Medium Leaves https://scrapbookingncraft.com.au/item_3307/FL08-Flowers-Vines-White-Medium-Leaves.htm

Abstract Leaves
https://scrapbookingncraft.com.au/item_3077/Wh95-White-Mixed-Media-Cardstock-Small-Abstract-Leaves.htm

Word Congrats
https://scrapbookingncraft.com.au/item_1864/W045-Word-Congrats.htm Word Thinking of you https://scrapbookingncraft.com.au/item_1545/W020-Word-Thinking-of-you.htm

Valentine’s and Love Cards

Hello Fellow Alchemists,

Today I am sharing with you the Hedgehog Hollow December 2020 Box that has a strong Valentine’s/love theme. I ended up making two cards in the video and showed a bunch more I made at the end. You can see a previous box here and get your own box here.

For the first card I used Catherine Wheel and Storm Cloud Nuvo Shimmer Powders to make a background and then stamped the background stamp with the Clear Mark embossing pad. I then used Stampendous’ detail gold embossing powder to emboss the background and the sentiment strip with the little birdy and Love You.

Valentine’s and Love Cards

Bonus Cards

The next 3 cards are only shown in the video, I used the stencil from the box with some Distress Oxide and a blender brush. I layered a watercoloured floral heart over one, and added Altenew Build Rose flowers to the other two with sentiment strips. For the other card not made in the video I used the background I did make and layered 3 sets of the LOVE die I got from the range in England.

I made a mess…

This next card was messy! I started by stamping the heart ornaments across the top and colouring them with Nuvo Coral Alcohol Markers. I then embossed My Love with black Nuvo embossing powder and the hearts with Stampendous detail gold. Here’s where things went bad… I used the Nuvo Midas Touch pen to add gold shimmer and it went everywhere! To cover the mess I used some DoCrafts Clear Dimensional Glaze to the hearts and cut an extra one to add over the mess in the corner.

I hope you enjoyed these cards using the Hedgehog Hollow December 2020 box. In the end I had fun making some of them even if I did get frustrated at my constant mistakes! Let me know your fave Below. Thanks for stopping by.

The Arty Crafty Alchemist

Papercraft Essentials Issue 181

Today I am sharing with you Papercraft Essentials Issue 181 and making a few projects mostly with the 3D embossing folder. This is the first 3D embossing folder in my stash!

I really like this 3D embossing folders versatility from Papercraft Essentials Issue 181 because the embossed side looks like gems and the debossed side looks like honeycomb. The honeycomb side made a great backdrop to the Elizabeth Crafts Buzzin’ Around stamps and dies. With a little Wild Honey Distress Oxide and some sparkly silver vellum the cards was complete.

3D Embossing folder and Elizabeth Crafts

The next two cards I ran with the Geo theme and used Tim Holtz’ Geo Springtime Butterfly die cuts for one card, blending out some more oxides in the background. Then I used Salty Ocean and Wilted Violet as my colours of choice and Happy Mother’s Day was heat embossed in white finished this card off. The next card has a background of Candied Apple Oxide and some Poppy Crafts Hexagons. The Hedgehog Hollows Finding Your Way Heart is stamped and embossed with Glacier White Nuvo detail embossing powder. The sentiment is from Honey Bee Stamps

Geo Butterfly and Heart Cards

The last card showcases both the Geo stamps and 3D embossing folder from Papercraft Essentials Issue 181. The fox was stamped with memento, Coloured with Copics in YR21 YR24 and YR27, then fussy cut out. The vellum looked so pretty as the bee wings that I decided to use a pale blue piece as the backdrop over the 3D embossing folder. I stacked a hello die cut and stamped foxy lady on a banner to finish off the card.

Foxy Lady card

I hope you enjoyed this look at Papercraft Essentials Issue 181. But my one criticism is that my embossing folder has almost split at the crease as a result of running it through the Cuttlebug a couple of times. Some box tape should sort that out because I really want to use it more! Let me know below which is you favourite card bellow. Thanks for stopping by.

The Arty Crafty Alchemist

Scrapbookingncraft Halloween Collab Week 2

  1. Hello fellow Alchemists,

It’s week two of the Scrapbookingncraft Halloween collab using the chipboard shapes I showed last week. A bunch of lovely ladies are getting their Spooky Halloween vibes going and I will link them all below. Please check them out, they are all very talented!

The Lawn Fawn Reveal Wheel dies are really easy to use, the hardest part was choosing which papers to use… I chose some ghosts and eyeballs from the DCWV Spooky Halloween stack. I die cut the ghosts with one of Lawn Fawns Meadow Borders and then with the Reveal Wheel die to make it the right size. Something I had seen on the Lawn Fawn YouTube channel.

I cut the eyeball paper with the Reveal Wheel die and layered the grass at the bottom. Then I misted the cat’s shape onto watercolour paper (probably why the shimmer disappeared) with Tim Holtz Black Soot followed by Heidi Swapp’s Colour Shine. I fussy around it and glued it slightly under the grass.

Halloween Reveal Wheel Card

I used stamps from Lawn Fawns Reveal Wheel Holiday Sentiments set to stamp the  wheel. After that I also stamped a sentiment on black cardstock with an embossing pad and used white embossing powder. Everything surrounding the Reveal Wheel is popped up on foam tape. Watching Lawn Fawns tutorial helped me get it right.

I hope you enjoyed this collab, please check out the other ladies linked below. Hope you are creating your own arty crafty alchemy. Bye for now.

The Arty Crafty Alchemist

Host Channel Scrapbookingncraft

Alexis and Melinda Art Space

Wendy Mason

Heavenly Imaginings

You are here —>Arty Crafty Alchemy

BraveBlueRaven Art and Craft

Crafty Kylie

Joanne Leigh

Card and Matching Canvas feat August 2018 LaLa Land Hedgehog Hollow Box

Hello fellow Alchemists,

For this months LaLa Land Hedgehog Hollow Box I went all out! This week making a total of three projects and matching them to last weeks box project. You can get your own Hedgehog Hollow box here.

Using the Marvy Uchida watercolour pencils that were sent to regular subscribers, I coloured three hedgehogs. I used mostly the brown and black pencils, using the black to darken the brown tone . To carry through the British theme through to the hedgehogs I added some red and the darker blue to the hedgehogs accessories.

I worked on my card and canvas at the same time, I applied Distress Oxide inks the same way I had for the box. I used Antique Linen, Walnut Stain and Black Soot. Wide washi tape was added to the bottom of both pieces to I could tie them in with the box too.

Next I used the LDRS Raven hybrid ink to stamp the images and sentiments.  The stamps I used were Hedgehog Hollows Global Love and Sending Hedgehugs and Looking Sharp from LaLa Land Crafts. Again I used the same images of Big Ben, the bus and taxi to tie back to the box.

For the card and canvas I used foam tape behind the hedgehogs and sentiments. I turned the sentiments into banners by cutting a fish tail at one end. Under the hedgehogs little feet  I used Kool Tak clear foam tape.

The envelope was the easiest piece to make as all I did was add the washi at the bottom and the third hedgehog with glue. I really hope you enjoyed this months projects using the LaLa Land Hedgehog Hollow Box. Go create some arty crafty alchemy yourselves and I’ll see you all later!

The Arty Crafty Alchemist


August 2018 LaLa Land Crafts Hedgehog Hollow Box and Project

  • Hello fellow Alchemists,

Today I am sharing with you the August 2018 LaLa Land Crafts Hedgehog Hollow Box and a Project. It’s not  a card this time, I’m branching out with a decorated box. 😃 You can see one of my previous Hedgehog Hollow projects here.

Sometimes I start a project with a clear idea of that I want to make. Today I definitely had some inkling that fully formed as I went along. I knew I wanted to use the washi and the Lve stamps with the hearts. The rest was just going with the flow and seeing what happened…

The box die is the Brutus Monroe Gable box die and I added colour to it with makeup brushes and Distress Oxides. I used Antique Linen and Walnut Stain with some Black Soot around the edges. The stamping was done with LDRS hybrid ink in Raven.

All three stamp sets in the box got a workout. I used the Global Love set for the boxes short sides then added washi the long sides. The Hedgehog and Time for Tea were from the LaLa Land Looking Sharp stamp set and also the bus, Big Ben and the cab too. Lastly I used the Sending Hedgehugs set to stamp the sentiment on the tag hanging from the box.

The hedgehog I coloured with the Marvy Uchida watercolour pencils regular subscribers got. There seems to be quite a lot of pigment in these pencils and I want to play with them some more. Blending pencils together gave me an endless amount of colours though I didn’t need many.

I hope you enjoyed this week’s project and if you watched the video you would have heard what sparked the idea for this project. I hope you are creating some arty crafty alchemy yourself and I will see you next time. Bye for now.

The Arty Crafty Alchemist

Amp it up August 2018 with Heavenly Imaginings, Embellishment Week

Hello fellow Alchemists,

This week was embellishment week for the Amp it up August collab with Heavenly Imaginings. I made some giant paperclips and large poinsettias with danglies.

The poinsettias were made with some flowers I had in my stash. They have a gorgeous velvety feel. To make the danglies I used some chain and beads again from my stash. Sometimes casing your stash is the best thing you can do! 😃

I made two different styles of paper clips. For the first set I used wire edged Christmas ribbons to make bows. During the course of making these I discovered that premaking the bows and using hot glue to add them to the paperclip was best. I then took a piece of the ribbon and wrapped it around the middle of bow and over the paper clip to make everything secure.

The second style of bow I made uses the Tim Holtz Paper Rosette and Mini Rosettes dies. Hot glue is not my friend! I burnt my fingers a lot 😂. I used hot glue to add these to the paperclips and a circle punched from patterned paper to make their backs neat.

The centres of the rosettes and bows are decorated with embellishments I pulled off Christmas wine markers, Dress It Up buttons and a little tree from Kmart. I think they turned out quite cute. What do you think? The papers are from the Kaisercraft Collections, Yuletide and Pear Tree. Don’t forget to check out all the other talented ladies in the collab. Hope you are creating your own arty crafty alchemy. Bye for now.

The Arty Crafty Alchemist

Please check out he other Lovely Ladies in the collab:
Heavenly Imaginings
Alexis and Melinda’s Art Space
Blue Raven Art and Craft
Crafty Kylie
Fiona Jane
Joanne Leigh
Wendy Mason

Amp It Up August Gift Cards and Tags Collab with Heavenly Imaginings

Hello fellow Alchemist,

Welcome to the Amp It Up August blog hop hosted by Heavenly Imaginings. This week is Gift Cards and Tags and a group of us lady’s have put together some lovely projects to share. I will link everyone below.

Today I made five tags and six gift cards. I have an overall theme happening because for the last week I want to tie most things together 😊 The papers and ephemera are all from Kaisercraft and the Mini Vellum Tags are from Making Memories. The paper pads I used were Twig & Berry and December 25th. I used ephemera from the Turtle Dove, Silent Night and Twig & Berry collectibles.

Stamps used came From Studio G, Holiday clear stamps and Hampton Arts Joyous Holiday by Alison Wong. They were stamped with Versamark embossing ink and sprinkled with either Hampton Art gold or Alison Ellis Designs Golden Sparkle embossing powder. After being stamped and embossed on black cardstock they were turned into small word banners.

To all the big tags I cut with the Tom Holtz Tag Collection dies I added ribbons. I also added ribbons and stickers to all the Making Memories Vellum Tags. To finish everything off I added miscellaneous pearls and rhinestones.

Don’t forget to check out the projects of the lovely ladies below 🙂 Hope you are creating some arty crafty alchemy yourselves. Bye for now

The Arty Crafty Alchemist.

Please check out he other Lovely Ladies in the collab:

Heavenly Imaginings
Alexis and Melinda’s Art Space
Blue Raven Art and Craft
Crafty Kylie
Fiona Jane
Joanne Leigh
Wendy Mason

Rainbow Card Using The July Hedgehog Hollow Sunny Studios Box

Hello fellow Alchemists,

Today I am sharing with you a Rainbow Card using the July Hedgehog Hollow Sunny Studios Box. You can see my unboxing here and the first card I made with it here. I love the paper Sunny Studios gave us in this box! Pretty pretty rainbows 🙂

Starting with my usual Kmart card base and cut one panel on the long side with the stitched ric rac border die from the Sunny Studios Ric Rac Border Dies. Taking the ric rac die, I cut six different colours of the Rainbow Bright paper that came in the box. Then using the 6 pieces of ric rac to create a rainbow above where I die cut the card base and adhered them with Helmar glue.

I  then took the Rainbow Text Die and cut it five times with black cardstock that had one side covered with Crafts 4 U double sided tape. Layering these up gives dimension. The sentiment is from the Over the Rainbow stamp set from the box and stamped with the Tim Holtz Stamp Platform with Archival Ink. With the stamped element in place I added the dimensional rainbow word.


Next I used a bunch of sequins to decorate the card. I used some I purchased from Ali Express and some from Darice. These were glued down with Lawn Fawndamentals glue. Finally for a little more shine I decided to add some Glossy Accents to the stacked rainbow word.

It was fun to create this Rainbow Card using The July Hedgehog Hollow Sunny Studios box.  Be sure to check out my 250 Sub Party video so you don’t miss out! Hope you are creating your own arty crafty alchemy, bye for now.

The Arty Crafty Alchemist